BAKING: Claire Saffitz’s Honeyed Walnut Buns (w/recipe)
Last week, Claire went on Instagram Live to debut a recipe in honor of Kitchenaid’s new color for the season, honey.

I knew immediately I had to make this recipe. For one, I love honey. I also knew I had all the ingredients in my kitchen at that moment. And lastly, it would be a chance to work with yeasted dough with my new thrifted Kitchenaid stand mixer.
She posted the recipe in her stories:
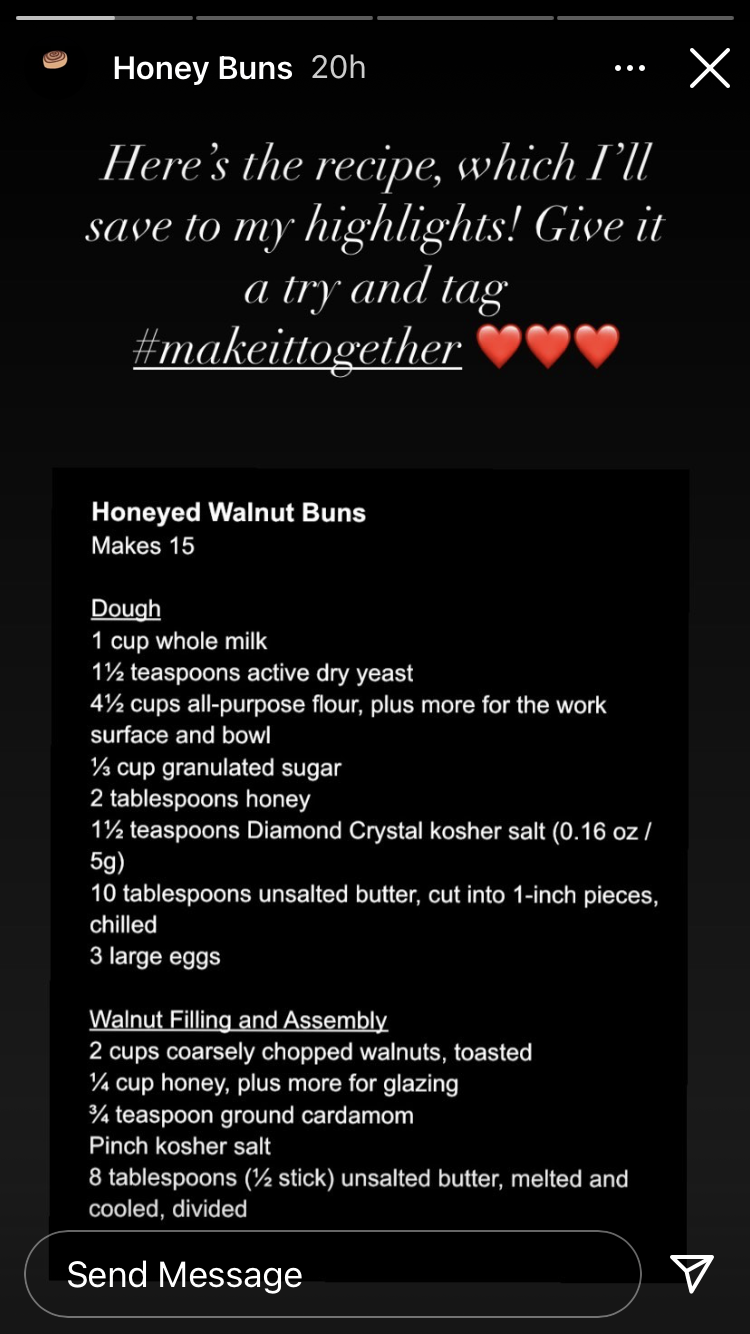
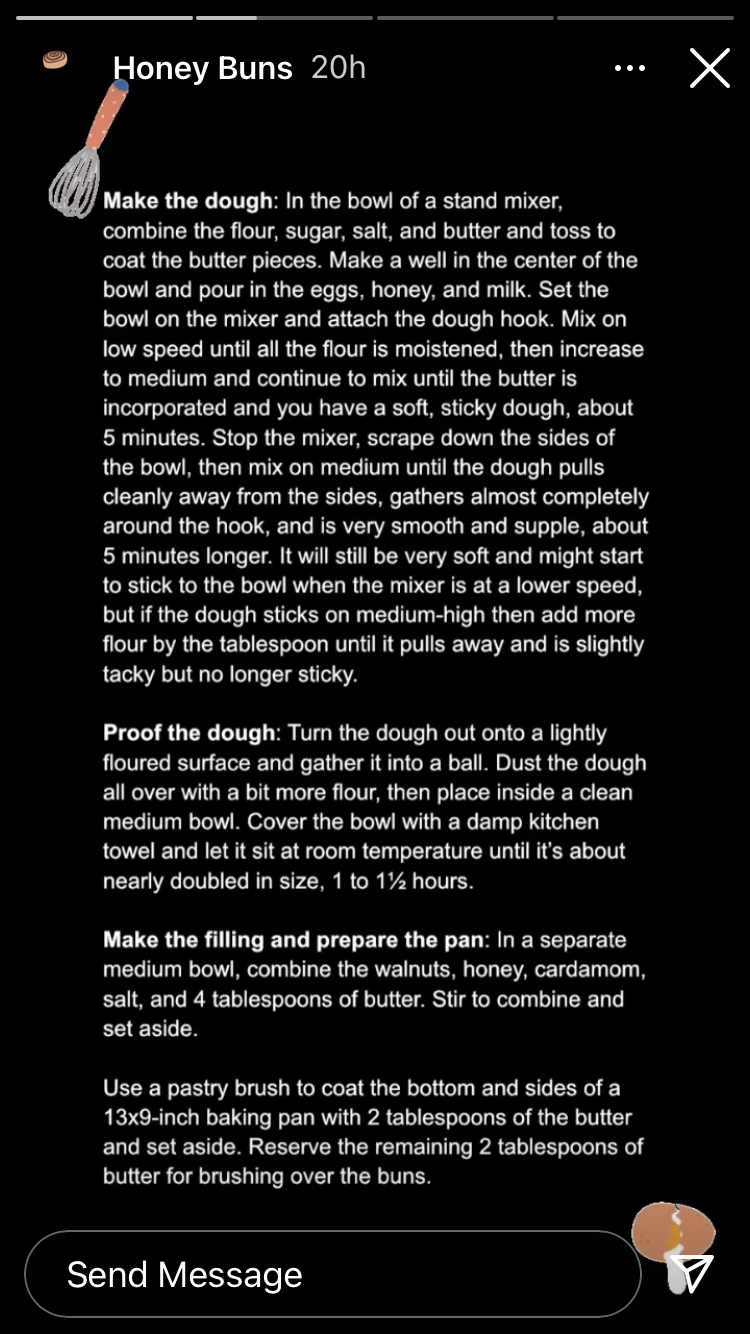
Which I immediately transcribed (below!) and got to work.
Since I didn’t plan on blogging this, I didn’t take pictures while I was working, but I do have a couple pictures of the finished product:
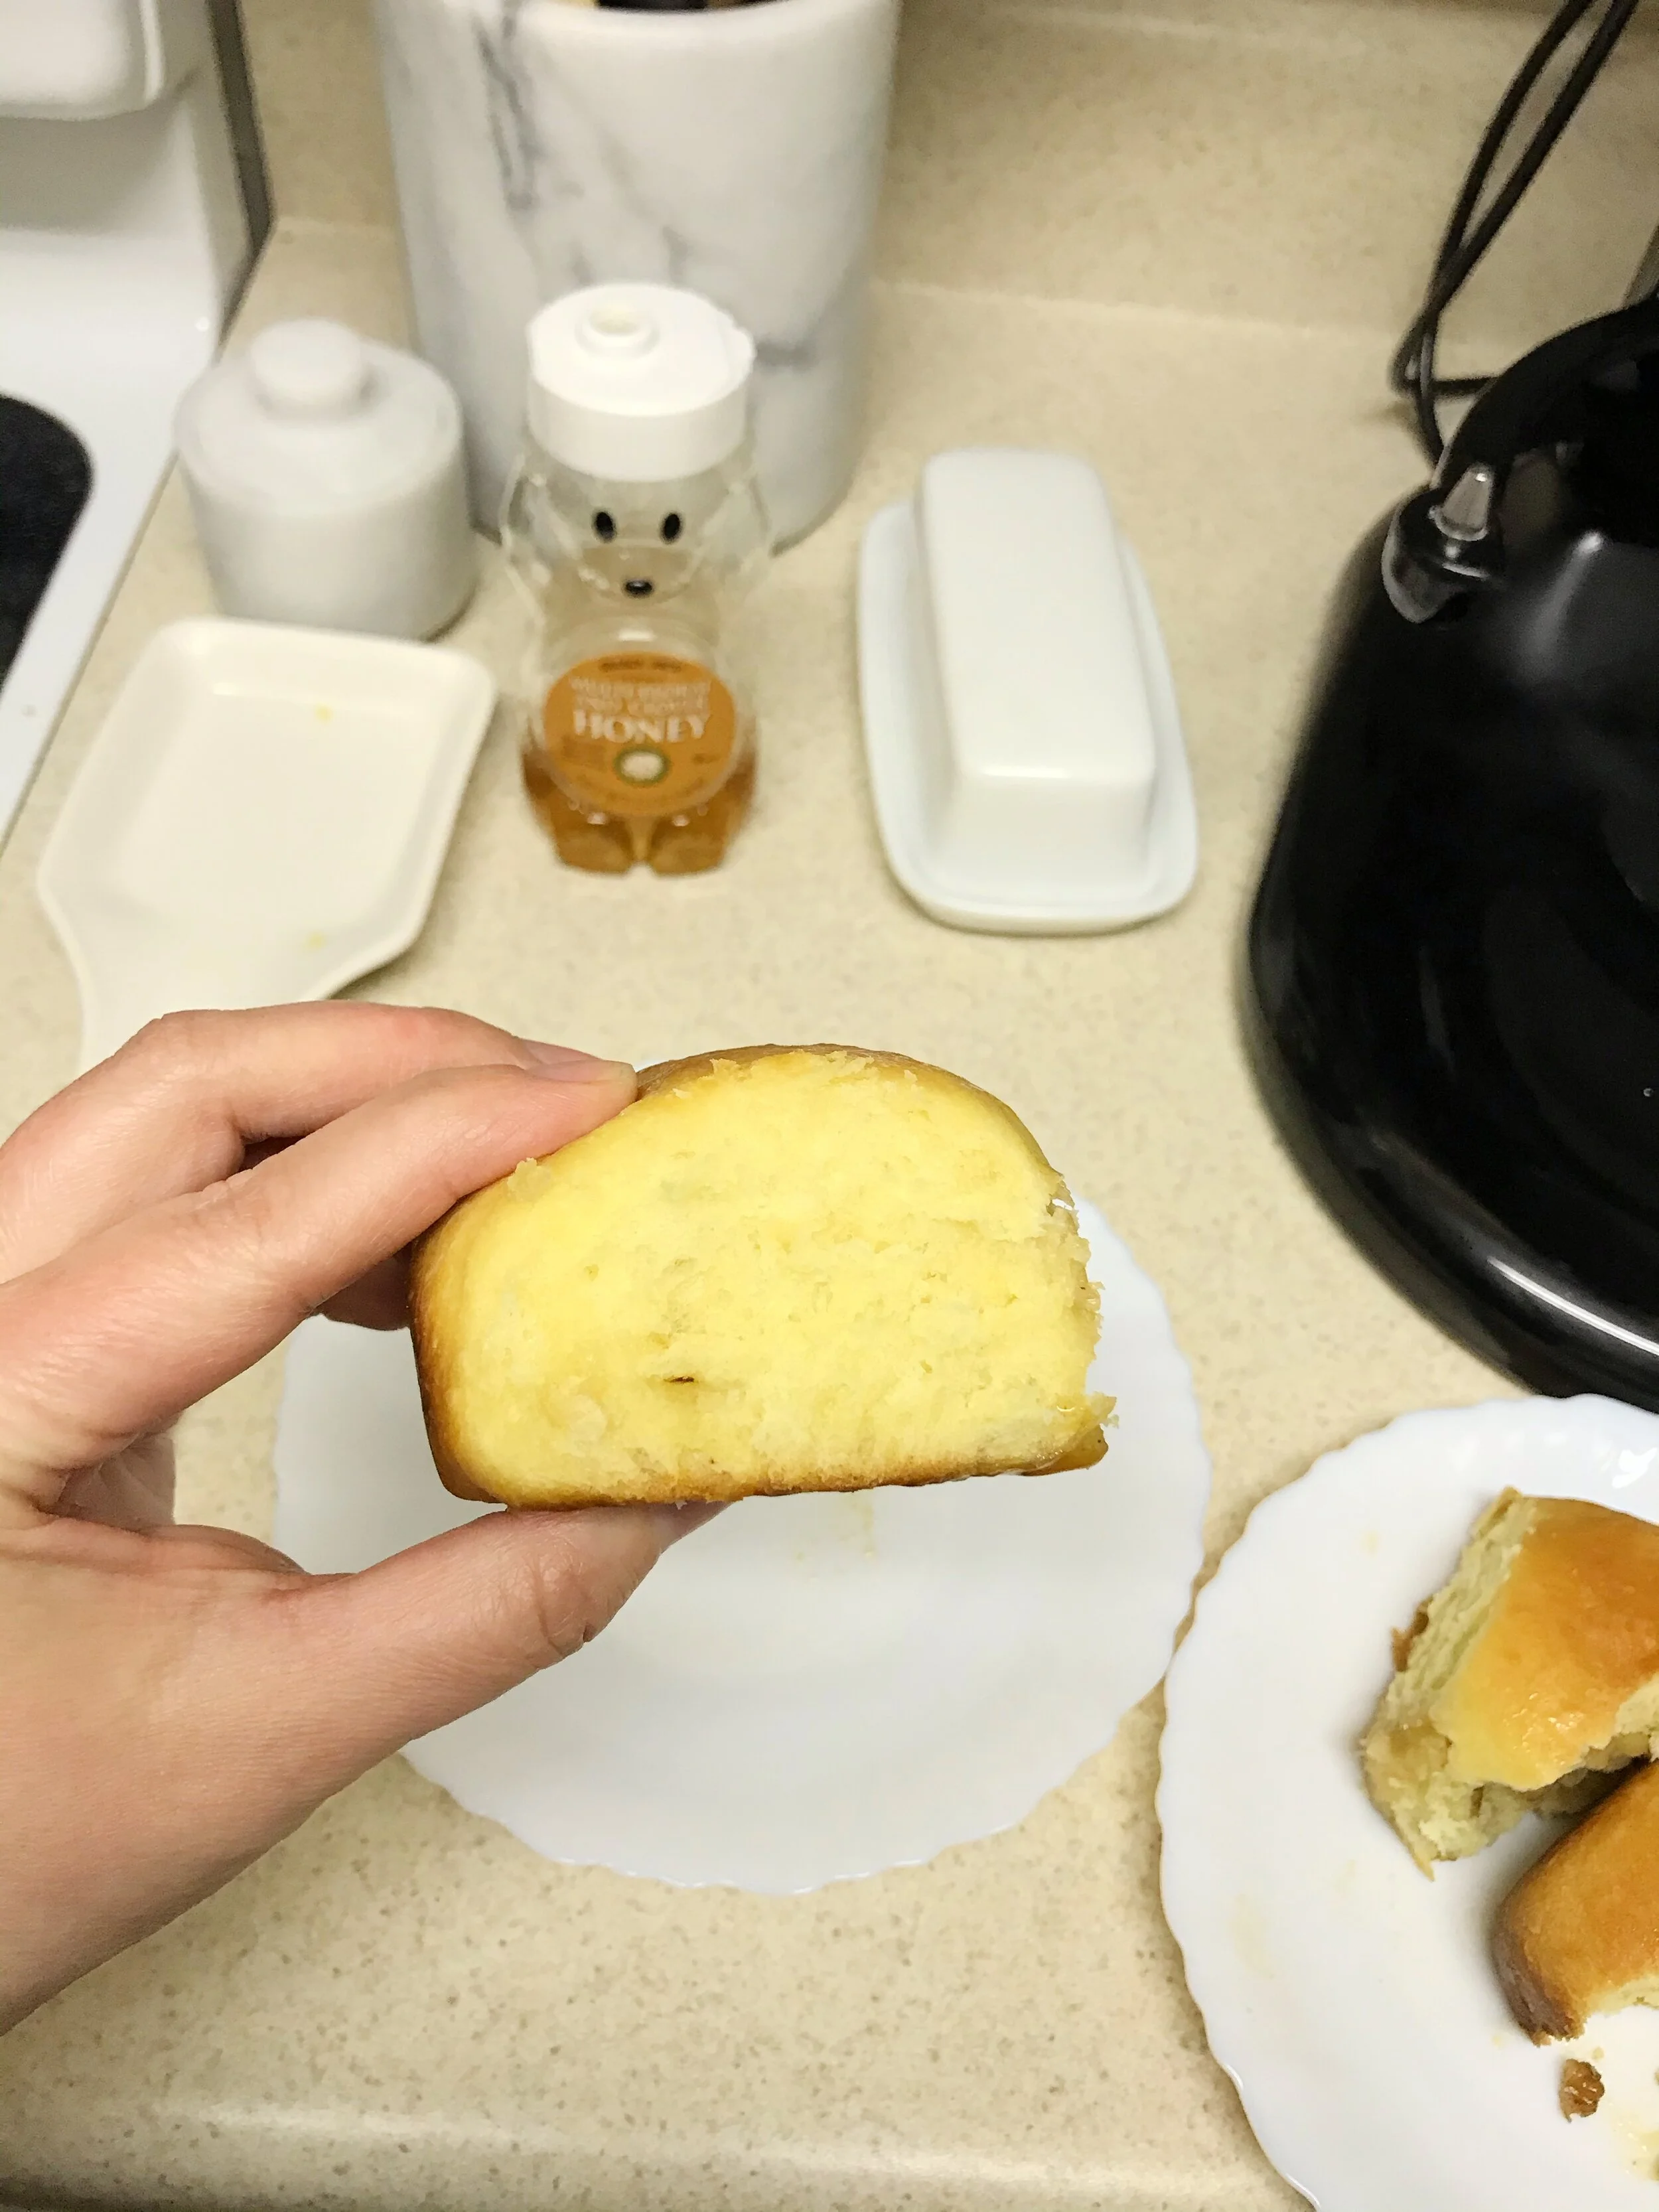
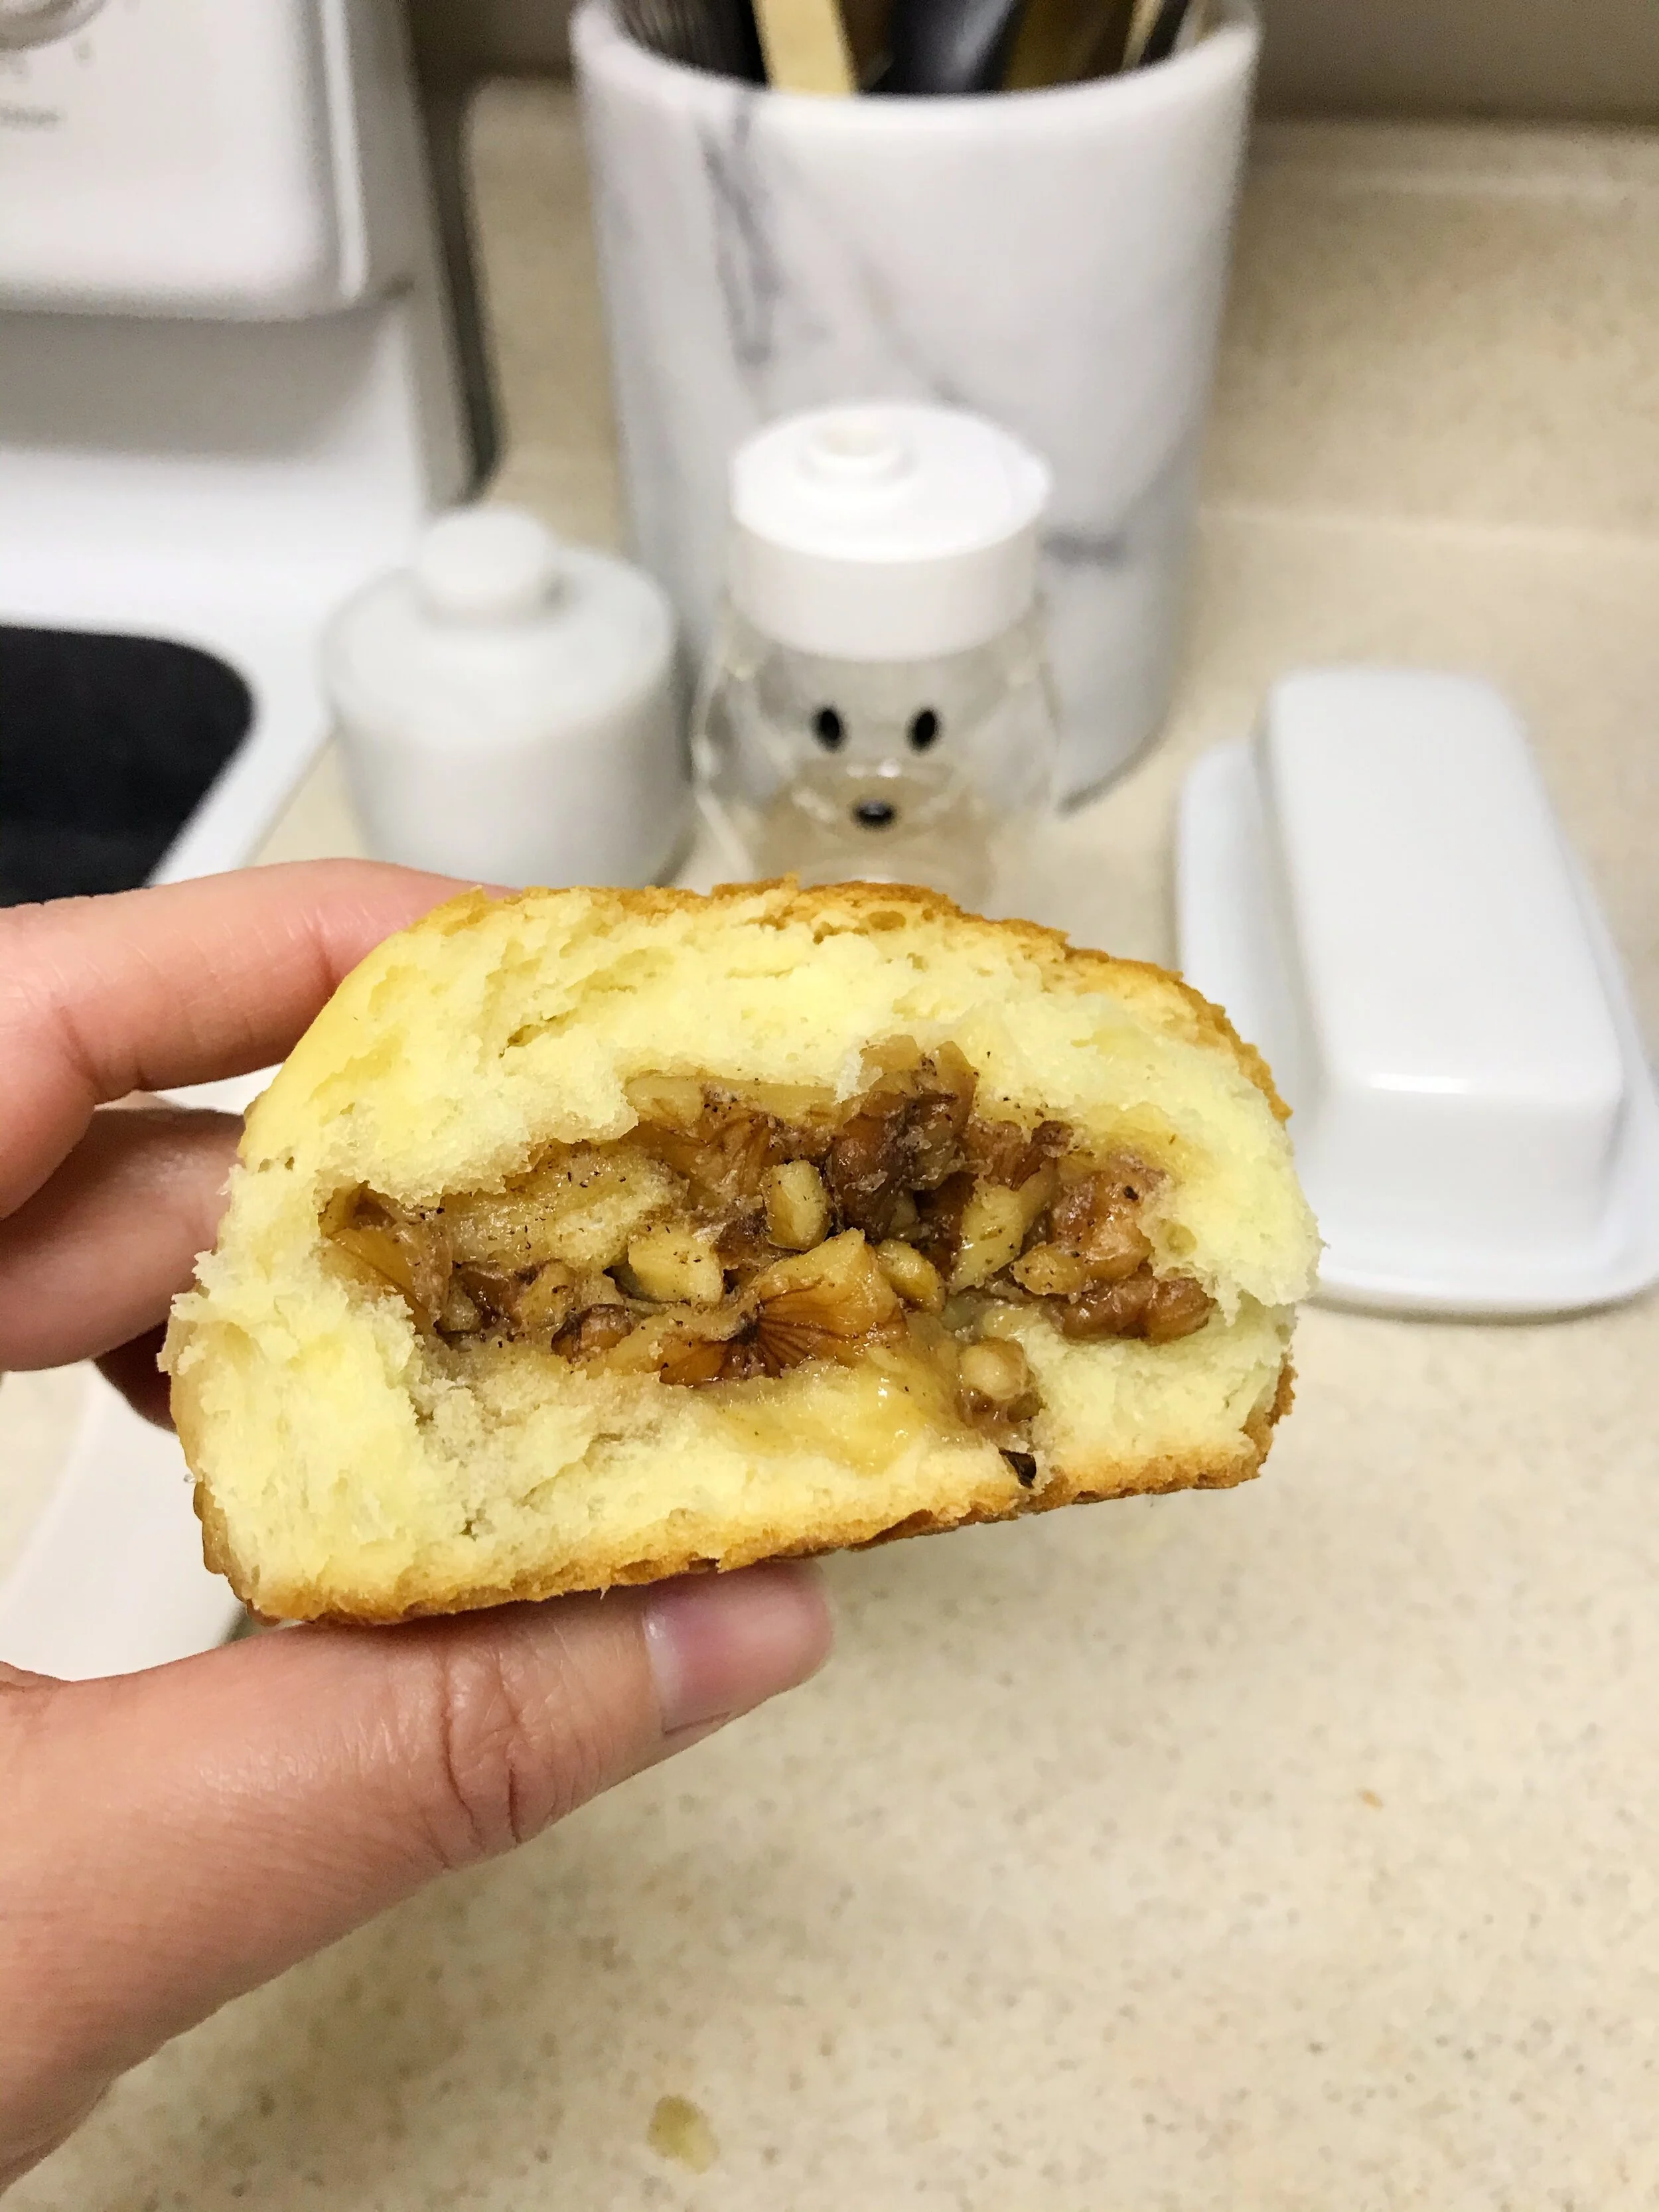
These are really great and I recommend you making them!
A COUPLE TAKEAWAYS: Mine turned out a little dense, so I think I didn’t knead the dough enough and create enough gluten. I was scared to overwork the dough, but it turns out that I needed to work it a bit more. (They were still good, though!) And also, if you’re not a fan of cardamom, I would suggest scaling it back a bit. Maybe I’m too sensitive to it, but 3/4 tsp was too much for me. I’m going to do 1/2 tsp next time.
If you try them, let me know in the comments how you liked them!
Honeyed Walnut Buns
Recipe by Claire Saffitz
Makes 15
DOUGH
1 cup whole milk
1 1/2 tsp active dry yeast
4 1/2 cups all-purpose flour, plus more for the work surface and the bowl
1/3 cup granulated sugar
2 TB honey
1 1/2 tsp Diamond Crystal kosher salt
10 TB unsalted butter, cut into 1-inch pieces, chilled
3 large eggs
WALNUT FILLING & ASSEMBLY
2 cups coarsely chopped walnuts, toasted
1/4 cup honey, plus more for glazing
3/4 tsp ground cardamom
Pinch kosher salt
4 TB (1/2 stick) unsalted butter, melted and cooled, divided
MAKE THE DOUGH: In the bowl of a stand mixer, combine the flour, yeast, sugar, salt, and butter and toss to coat the butter pieces. Make a well in the center of the bowl and pour in the eggs, honey, and milk. Set the bowl on the mixer and attach the dough hook. Mix on low speed until all the flour is moistened, then increase to medium and continue to mix until the butter is incorporated, and you have a soft, sticky dough, about 5 minutes. Stop the mixer, scrape down the sides of the bowl, then mix on medium until the dough pulls cleanly away from the sides, gathers almost completely around the hook, and is very smooth and supple, about 5 minutes longer. It will still be very soft and might start to stick to the bowl when the mixer is at a lower speed, but if the dough sticks on medium-high, then add more flour by the tablespoon until is pulls away and is slightly tacky but no longer sticky.
PROOF THE DOUGH: Turn the dough out onto a lightly floured surface and gather it into a ball. Dust the dough all over with a bit more flour, then place inside a clean medium bowl. Cover the bowl with a damp kitchen towel and let it sit at room temperature until it’s about nearly doubled in size, 1 to 1 1/2 hours.
MAKE THE FILLING AND PREPARE THE PAN: In a separate medium bowl, combine the walnuts, honey, cardamom, salt, and 4 tablespoons of butter. Stir to combine and set aside. Use a pastry brush to coat the bottom and sides of a 13x9-inch baking pan with 2 tablespoons of butter and set aside. Reserve the remaining 2 tablespoons of butter for brushing over the buns.
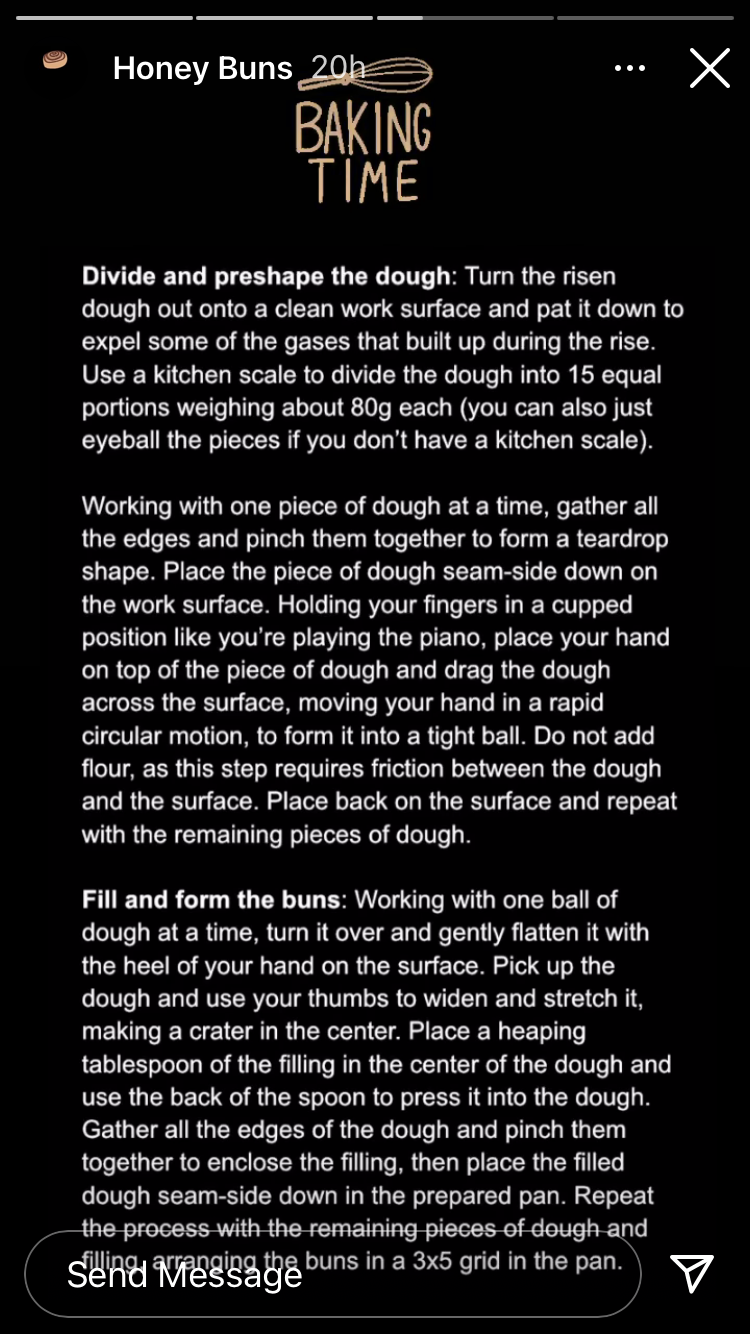
DIVIDE AND PRE-SHAPE THE DOUGH: Turn the risen dough out onto a clean work surface and pat it down to expel some of the gasses that built up during the rise. Use a kitchen scale to divide the dough into 15 equal portions weighing about 80g each (you can also just eyeball the pieces if you don’t have a kitchen scale). Working with one piece of dough at a time, gather all the edges and pinch them together to form a teardrop shape. Place the piece of dough seam-side down on the work surface. Holding your fingers in a cupped position like you’re playing the piano, place your hand on top of the piece of dough and drag the dough across the surface, moving your hand in a rapid circular motion, to form it into a tight ball. Do not add flour, as this step requires friction between the dough and the surface. Place back on the surface and repeat with the remaining pieces of dough.
FILL AND FORM THE BUNS: Working with one ball of dough at a time, turn it over and gently flatten it with the heel of your hand on the surface. Pick up the dough and use your thumbs to widen and stretch it, making a crater in the center. Place a heaping tablespoon of the filling in the center of the dough and use the back of the spoon to press it into the dough. Gather all the edges of the dough and pinch them together to enclose the filling, then place the filled dough seam-side down in the prepared pan. Repeat the process with the remaining pieces of dough and filling arranging the buns in a 3x5 grid in the pan.
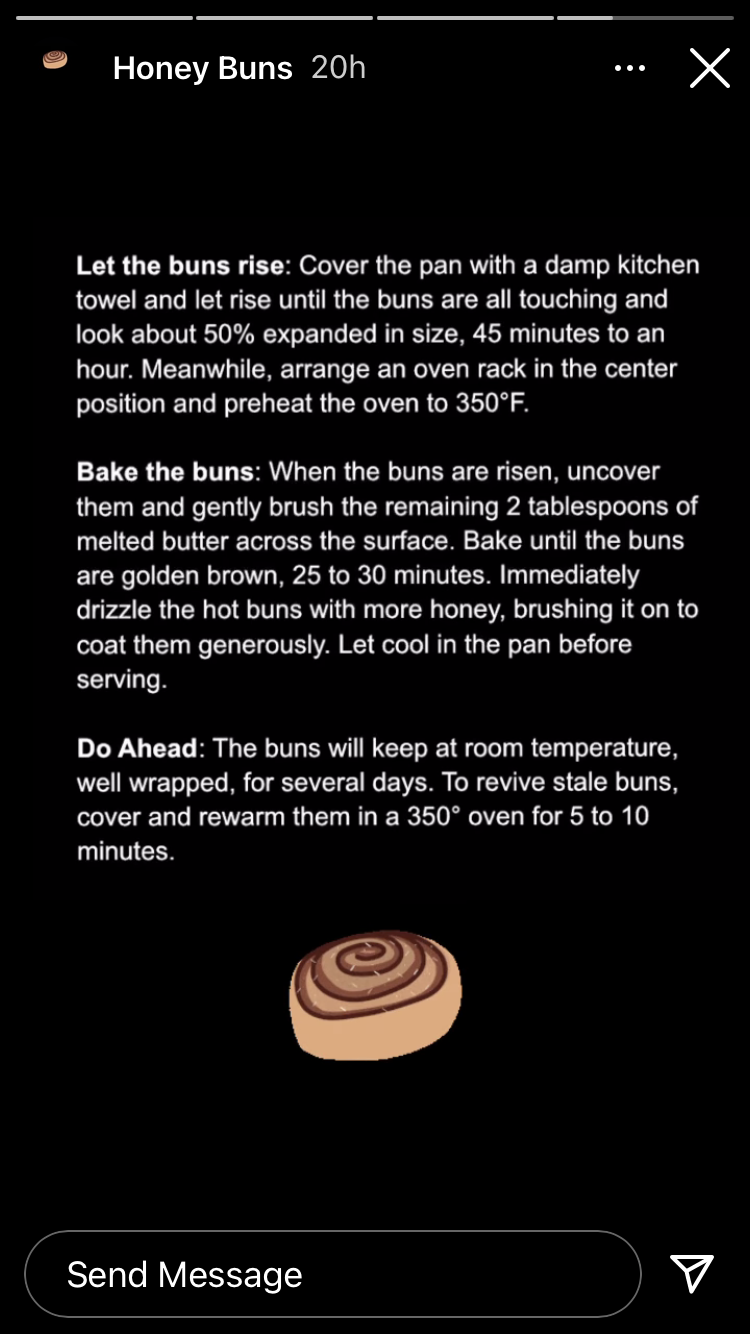
LET THE BUNS RISE: Cover the pan with a damp kitchen towel and let rise until the buns are all touching and look about 50% expanded in size, 45 minutes to an hour. Meanwhile, arrange an oven rack in the center position and preheat the oven to 350 degrees F.
BAKE THE BUNS: When the buns are risen, uncover them and gently brush the remaining 2 tablespoons of melted butter across the surface. Bake until the buns are golden brown, 25 to 30 minutes. Immediately drizzle the hot buns with more honey, brushing it on to coat them generously. Let cool in the pan before serving.
DO AHEAD: The buns will keep at room temperate, well wrapped, for several days. To revive stale buns, cover and rewarm them in a 350-degree oven for 5-10 minutes.